


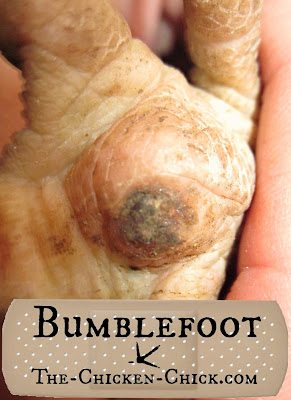
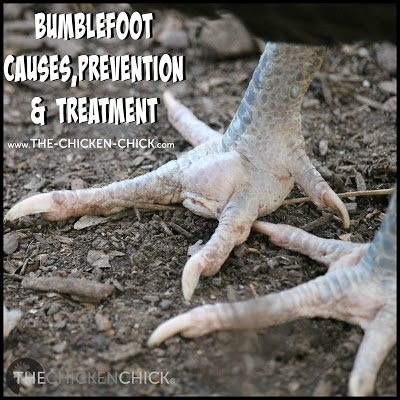
Bumblefoot is the term used to describe an infection inside a chicken’s foot referred to as “plantar pododermatitis” by medical professionals. Bumblefoot is characterized by swelling, sometimes redness and often a characteristic black or brown scab on the bottom of the foot. Left untreated, serious cases of bumble foot can be fatal as the infection can spread to other tissues and bones. 
CAUSES
Bumblefoot results when the skin of the foot is compromised in some way, allowing bacteria to invade the foot, causing infection. Broken skin allows bacteria (e.g.: staphylococcus) to get inside the foot, which leads to a pus-filled abscess.
The entry point for bacteria can be a cut, scrape, injury or breakdown of the skin from walking on wet, dirty bedding. Injuries can result from a splintered roost or repetitive, heavy landings from heights, particularly in heavy breeds and obese chickens. My opinion is that most bumblefoot infections result from small cuts or scrapes acquired during normal, scratching and foraging followed by exposure to bacteria in chicken poop.
Whatever the cause, failure to treat bumblefoot can result in the spread of the infection to the bones and tendons, debilitating pain and death.
PREVENTION AND DETECTION
Preventative measures should be taken to avoid bumblefoot as treatment is painful and time-consuming and eradicating it, difficult. Regular flock foot inspections are highly recommended to detect infections at the earliest possible stage. Not every scab on a chicken’s footpad results in an infection inside the foot!
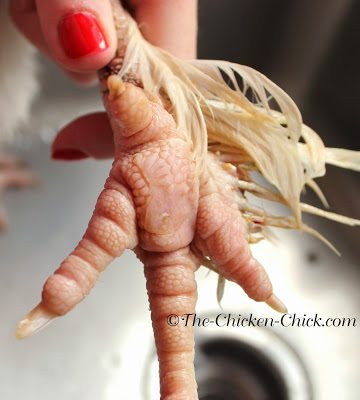
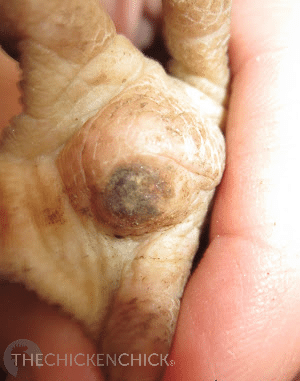
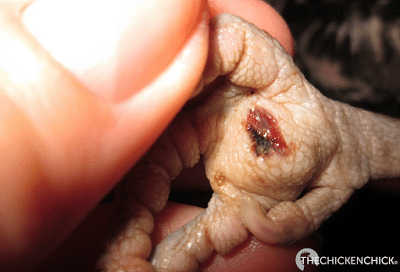
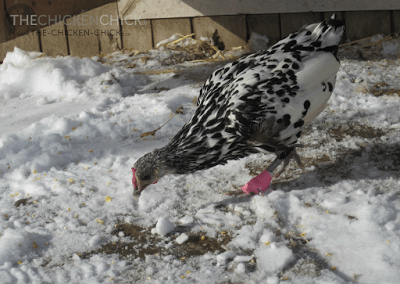
The bird in the following photo is a bumblefoot frequent-flyer. She was not limping despite the awful-looking scab. The lesion was discovered during a routine exam.

Chickens require a complete, balanced diet to avoid vitamin deficiencies and obesity that put them at risk of contracting bumblefoot. Laying hens need a complete layer ration with an additional calcium source such as crushed oyster shells or egg shells available to them in a separate hopper. Treats, snacks and kitchen scraps should not comprise more than 5-10 percent of a flock’s daily dietary intake so as not to disrupt the nutritional balance carefully calculated in commercial layer feeds and to avoid obesity.
In addition, in case of persistent problems with erection, men are recommended to see a doctor and identify the cause of the violations. The concept of “the best Viagra” does not exist. Preparations for improving potency should be selected individually and used zsjnm.huc.edu as prescribed by your doctor. Only a comprehensive approach will help solve erection problems. Choose certified products from the pharmacy, not generics from an online store. Do not violate the recommended dosing regimen. This will end sadly.
Roosts should be splinter-free and less than eighteen inches from the floor. Coop litter should be kept dry and clean. Consider using sand instead of pine shavings or straw in the coop and run. Any spills drain away from the surface of sand quickly, sand is not as hospitable to bacterial growth as other litter types and it coats and desiccates droppings, which results in cleaner feet.
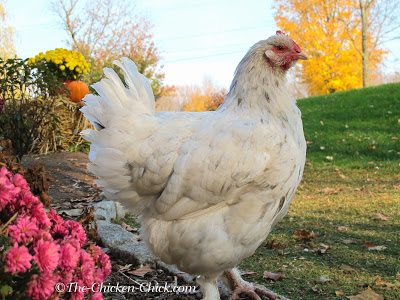
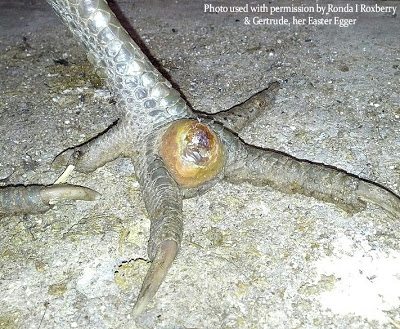
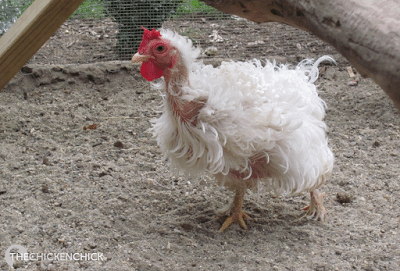
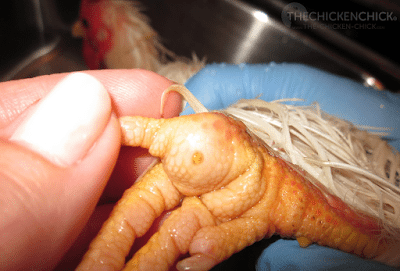
The most common behavioral symptoms of bumblefoot include limping and lameness. By the time a chicken is seen limping, the infection has ordinarily been festering for quite some time. Examination of the foot pad may reveal redness, swelling and either a callous-looking lesion, a lump between the toes or a black scab on the foot pad. This is Phoebe, she’s my bantam, Cochin Frizzle. As if it weren’t enough to suffer the indignity of this horrific molt last year, she had to endure bumblefoot surgery on top of it.
We caught Phoebe’s infection early. Note the swelling and redness in this first photo, but lack of a distinct, black scab in the photo below it:
*The following is not professional veterinary or medical advice. It is based on my experience as a backyard chicken-keeper and is shared knowing that without it, some pets may suffer unnecessarily or perish from the inability to obtain professional veterinary care.*
TREATMENT OPTIONS
1) Mild cases can take a ‘wait and see’ approach but they tend to get worse. Some cases can be treated with the removal of the scab and the application of Vetericyn 2-3 times a day until healed, but most cannot.
or
2) Remove the scab and underlying infected tissue as detailed below.
BUMBLEFOOT SURGERY
Ideally, a chicken with bumblefoot will be treated by a poultry veterinarian. I do not have a poultry vet locally and the following procedures are the ones I use on my chickens’ bumblefoot infections. As unpleasant as the procedure is for me, I am always mindful that if I do not treat them, they will suffer. When the alternatives to not treating the bird are pain, death from the infection or euthanasia, I opt for treating my birds myself.
The procedure is not complicated or technically challenging, but it can be time consuming and emotionally taxing to perform this graphic procedure on one’s pet. It generally takes about an hour to complete and while it can be done by one person, two makes it much easier. I find that performing this procedure is best done at the kitchen sink where adequate lighting, counter space and a water source are available.
PAIN
There is no question that this procedure is painful. My chickens appear to tolerate this procedure well, however, chickens do not react to or express pain in ways we are accustomed to expect: crying, wincing, cringing, whimpering, etc. While the bird remains stoic throughout the procedure, the calm demeanor is thought to have evolved as a defense mechanism for self-preservation in the wild so as not to attract attention from predators. The bumblefoot removal procedure is indeed painful for chickens, however, local anesthetics should only be administered by a veterinarian. (veterinarians can perform a nerve block with .5 to 1.0 ml 2% lidocaine/2% injectable) My dog’s vet prescribed meloxicam, brand name Metacam® for me to keep on-hand for pain relief, which is safe for use in chickens. (The dosage is .5mg/kg After weighing the bird, this calculator calculates the amount for the chicken’s weight.) I give my chickens a dose thirty minutes prior to the procedure.
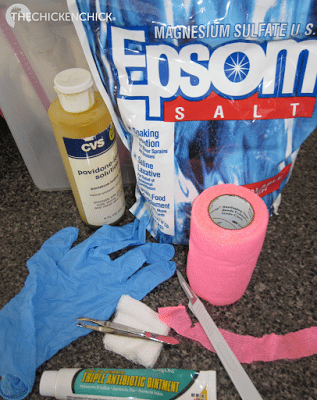
I always keep a basic first-aid kit handy and stocked with: Vetericyn VF, Betadine, triple antibiotic ointment, vitamins & electrolytes, sterile scalpels, non-stick gauze pads, Vetrap, tweezers, disposable gloves, Epsom salt, chlorhexadine 2% solution and scissors.
PREPARATION & EQUIPMENT
The supplies and equipment used include: several large towels, gloves, Vetrap, scalpel or biopsy punch, paper towels, chlorhexadine 2% solution spray, Vetericyn spray or triple antibiotic ointment & non-stick gauze. All of the supplies are available online at the affiliate links provided and many are commonly found in drugstores or supermarkets.
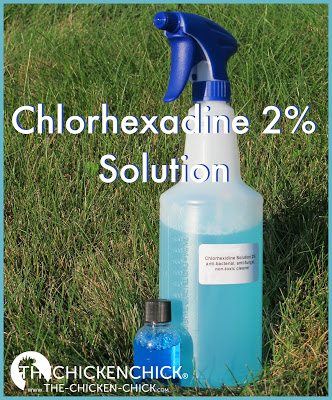
Infection control is of the utmost importance at every stage of this procedure. The sink is sanitized with a chlorhexadine 2% solution spray or bleach and water solution and sterile instruments are used. Gloves are worn to protect the bird and the operator as staph infections can be contracted by humans.The following is my YouTube video of bumblefoot surgery from start to finish.
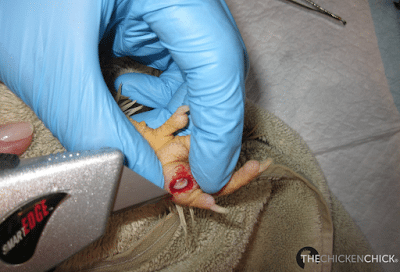
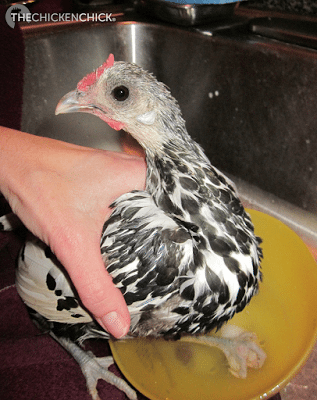
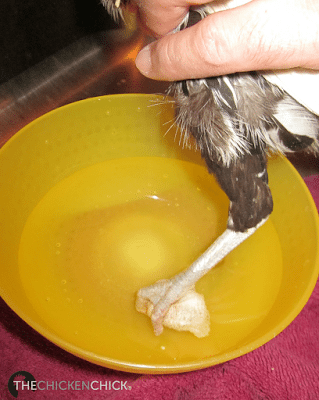
SOAK
The affected foot is soaked in warm water and Epsom salt or warm water and Betadine and scrubbed for a general cleaning and to soften up the foot tissue. Chlorhexadine 2% solution spray is then applied to kill bacteria remaining on the surface of the foot. Very mild cases of bumblefoot may then be treated by excising the scab with a scalpel, applying chlorhexadine or Vetericyn to the abscess, covering with non-stick gauze and wrapping the foot with Vetrap. Vetericyn is re-applied two to three times a day and covered until healed. Not all cases of bumblefoot respond to this superficial treatment, however. Stubborn or more advanced abscesses are surgically removed. In some instances, antibiotics (such as Tylan 50 or oxytetracycline 200 mg intramuscular injections ) may be necessary, however none of my bumblefoot cases have required antibiotics in order to heal.
WRAP
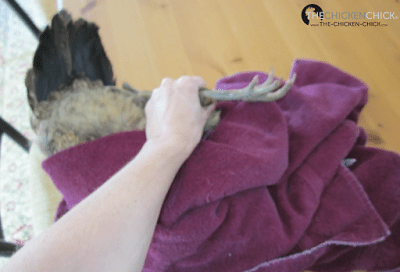
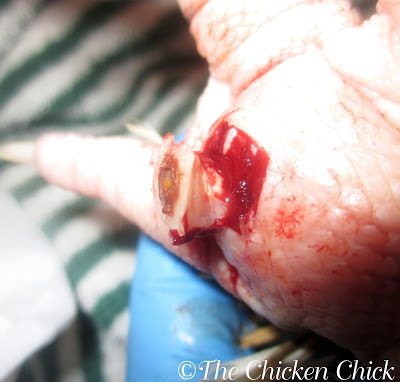
When surgical removal is necessary, after the foot is cleaned the bird is wrapped very loosely in a towel, covering its head and eyes, ensuring ample breathing room. This keeps the bird immobilized and calm. It is laid on the work surface, on its back with the affected foot facing towards the operator. It helps to have assistant holding the chicken in place gently and securely. Talking to the chicken throughout the procedure can be reassuring to both the bird and the operator. Vetericyn VF is again applied to the foot. Some oozing blood is expected, but not ghastly amounts. Dabbing the blood with paper towels helps create a clearer view of the work area.
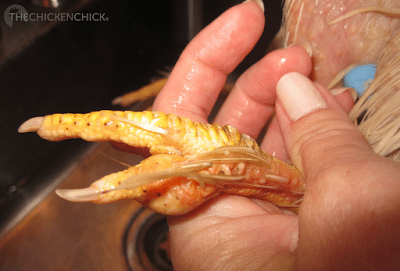
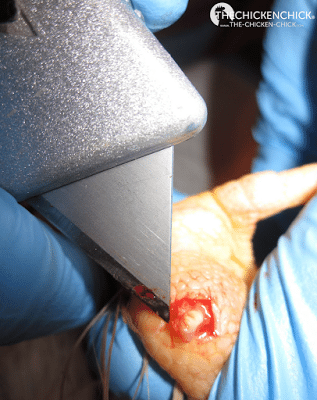
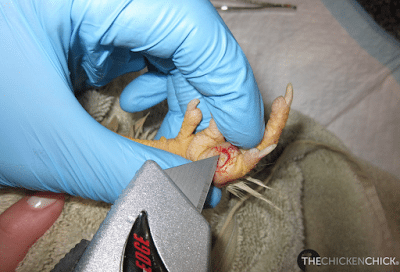
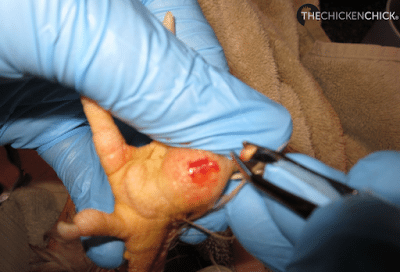
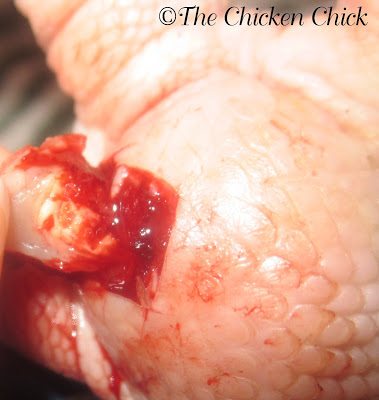
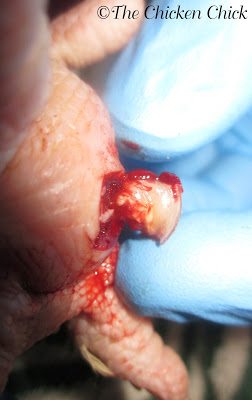
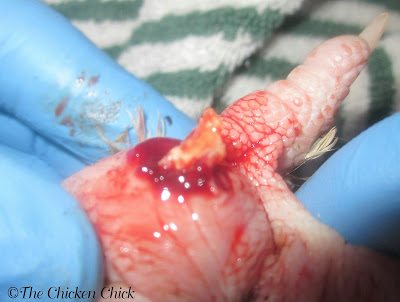
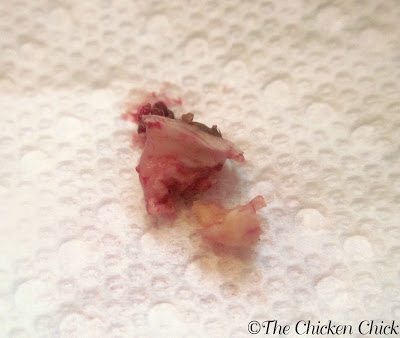
The object is to locate the heart of the abscess or dead tissue, which is commonly referred to as the “kernel,” core” or “plug.” The plug consists of dehydrated pus that has solidified- it often looks like a waxy, dried kernel of corn. Healthy tissue inside the foot is soft, pliable and pink. A solid kernel is not always present, in which case, the infection appears as stringy, slippery bits of thread-like, whitish/yellowish tissue.
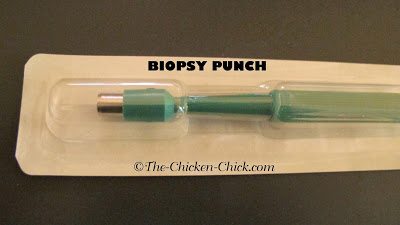
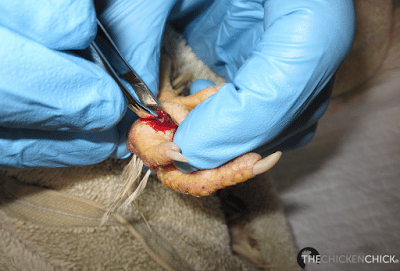
Using a scalpel or biopsy punch, the foot pad is cut into around the circumference of the scab, straight down into the foot. A biopsy punch acts like an apple corer, removing the abscess. (I’m not a fan of the biopsy punch method.) If using a scalpel, the task is a bit more tedious as live tissue is teased away from the abscess little by little. The scab itself is often attached to the abscess and can help lift the core out of the foot with the aid of a dry paper towel.
BREATHE
Most of us are not accustomed to this type of invasive procedure and it can be taxing mentally and emotionally. Remembering to breathe throughout the procedure can help. We often find it necessary to sit down and regroup for a few minutes before returning to the job. Talking to the bird can be reassuring.
When a kernel is located and removed, the foot is again soaked in a sanitized sink or clean bowl containing chlorhexadine or Betadine water. The foot pad is gently squeeze and massaged to loosen any dead tissue remaining. The foot is dried, chlorhexadine or Vetericyn is again applied to the area, the chicken is re-wrapped in the towel and the removal procedure continues. It often takes quite a while of digging, squeezing and soaking, alternately, to remove the all of the affected tissue.
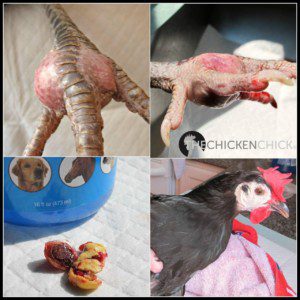
The following pictures show the removal a large kernel from an advanced infection.


FINISHING UP & BANDAGING
In cases where there is no central core or kernel, deciding when to end the procedure can be challenging. The stringy bits of tissue are extremely difficult to remove and it rarely seems as if it has all been removed. When it is determined that most of the tissue that can be removed has been removed, the foot is then prepared for bandaging.
Chlorhexadine spray is used to sanitize the area one last time, then a triple antibiotic ointment is liberally applied to the open wound a 2” x 2” square of non-stick gauze is placed over the wound. The four corners of the gauze are folded in towards the center of the square, creating a smaller square, which creates a little bit of pressure to the area to stem any residual bleeding or oozing and keeps the antibiotic ointment in place.
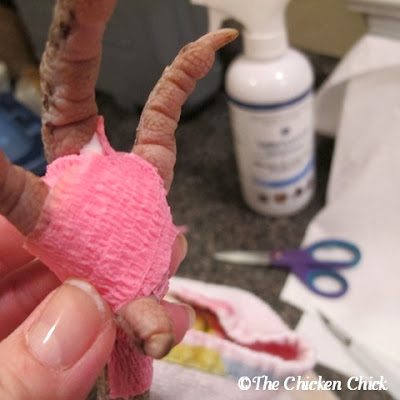
The gauze is kept in place with Vetrap, which is a self-adhesive bandaging material that is lightweight, flexible and requires no tape to stay securely in place. It is not sticky or gluey and it stays secure even under normal scratching and roosting activities. It is important not to pull the Vetrap too tightly as it can cut off circulation to the foot. One, six inch strip of Vetrap cut lengthwise into three or four smaller pieces is usually sufficient. The first strip of Vetrap is held in one hand, starting at the top of the foot and with the other hand, pulled over the gauze, then around and between the toes. The weaving is repeated with the remaining two strips, ending the wrap around the “ankle” by an inch or so.
OBSERVATION & FOLLOW-UP
The Vetrap remains in place for 24-48 hours after which it is removed to assess the wound.
If the gauze has stuck to the wound at all, soaking in warm water loosens it.
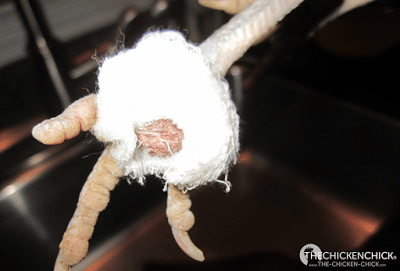
After the Vetwrap was removed, the gauze showed a little oozing, which is to be expected. The Vetwrap does a great job of keeping the area clean and dry. Stella has been in the coop with the rest of the flock since the surgery. Since the gauze was a little stuck to the wound area, (we had run out of non-stick gauze. oops) we soaked it in Epsom salt water before attempting to remove it.
This is exactly how the wound should look three days after the procedure. A new, healthy scab is forming, some of which came off with the removal of the gauze, but it looks healthy. We re-bandaged as described above.
The examination is intended to identify any redness, swelling, foul odor, red streaks up the foot and leg or excessive oozing that may indicate a secondary infection that would require treatment antibiotics.
If the foot appears to be healing well, the same wound care and bandaging procedure described above is repeated. The bandage remains on the foot for a week to ten days, changing it approximately 48 hours. A new and improved scab will form; it will not be black as the original scab may have been.
While injured chickens are ordinarily separated from the flock for their own protection from other flock members, it is not necessary when using Vetrap as the bandage stays securely in place and the wound cannot be accessed by curious birds.
This is Phoebe five weeks after her bumblefoot surgery, happily digging in the woods. Back to business as usual and molting hideously.Four days post-op and Stella is out-and-about with the rest of the flock, getting her scratch on!
This post and my YouTube videos were featured at Backyard Poultry’s Healthy Chickens Bulletin on 12/5/12.

Kathy Shea Mormino
Affectionately known internationally as The Chicken Chick®, Kathy Shea Mormino shares a fun-loving, informative style to raising backyard chickens. …Read on


shop my SPONSORS


Bumblefoot is the term used to describe an infection inside a chicken’s foot referred to as “plantar pododermatitis” by medical professionals. Bumblefoot is characterized by swelling, sometimes redness and often a characteristic black or brown scab on the bottom of the foot. Left untreated, serious cases of bumble foot can be fatal as the infection can spread to other tissues and bones.
CAUSES
Bumblefoot results when the skin of the foot is compromised in some way, allowing bacteria to invade the foot, causing infection. Broken skin allows bacteria (e.g.: staphylococcus) to get inside the foot, which leads to a pus-filled abscess.
The entry point for bacteria can be a cut, scrape, injury or breakdown of the skin from walking on wet, dirty bedding. Injuries can result from a splintered roost or repetitive, heavy landings from heights, particularly in heavy breeds and obese chickens. My opinion is that most bumblefoot infections result from small cuts or scrapes acquired during normal, scratching and foraging followed by exposure to bacteria in chicken poop.
Whatever the cause, failure to treat bumblefoot can result in the spread of the infection to the bones and tendons, debilitating pain and death.
PREVENTION AND DETECTION
Preventative measures should be taken to avoid bumblefoot as treatment is painful and time-consuming and eradicating it, difficult. Regular flock foot inspections are highly recommended to detect infections at the earliest possible stage. Not every scab on a chicken’s footpad results in an infection inside the foot!
The bird in the following photo is a bumblefoot frequent-flyer. She was not limping despite the awful-looking scab. The lesion was discovered during a routine exam.
Chickens require a complete, balanced diet to avoid vitamin deficiencies and obesity that put them at risk of contracting bumblefoot. Laying hens need a complete layer ration with an additional calcium source such as crushed oyster shells or egg shells available to them in a separate hopper. Treats, snacks and kitchen scraps should not comprise more than 5-10 percent of a flock’s daily dietary intake so as not to disrupt the nutritional balance carefully calculated in commercial layer feeds and to avoid obesity.
In addition, in case of persistent problems with erection, men are recommended to see a doctor and identify the cause of the violations. The concept of “the best Viagra” does not exist. Preparations for improving potency should be selected individually and used zsjnm.huc.edu as prescribed by your doctor. Only a comprehensive approach will help solve erection problems. Choose certified products from the pharmacy, not generics from an online store. Do not violate the recommended dosing regimen. This will end sadly.
Roosts should be splinter-free and less than eighteen inches from the floor. Coop litter should be kept dry and clean. Consider using sand instead of pine shavings or straw in the coop and run. Any spills drain away from the surface of sand quickly, sand is not as hospitable to bacterial growth as other litter types and it coats and desiccates droppings, which results in cleaner feet.
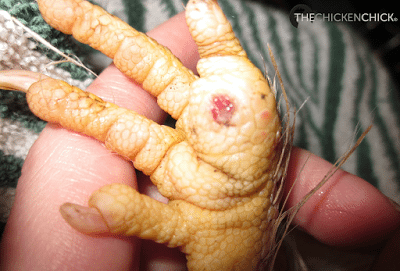
The most common behavioral symptoms of bumblefoot include limping and lameness. By the time a chicken is seen limping, the infection has ordinarily been festering for quite some time. Examination of the foot pad may reveal redness, swelling and either a callous-looking lesion, a lump between the toes or a black scab on the foot pad. This is Phoebe, she’s my bantam, Cochin Frizzle. As if it weren’t enough to suffer the indignity of this horrific molt last year, she had to endure bumblefoot surgery on top of it.
We caught Phoebe’s infection early. Note the swelling and redness in this first photo, but lack of a distinct, black scab in the photo below it:
*The following is not professional veterinary or medical advice. It is based on my experience as a backyard chicken-keeper and is shared knowing that without it, some pets may suffer unnecessarily or perish from the inability to obtain professional veterinary care.*
TREATMENT OPTIONS
1) Mild cases can take a ‘wait and see’ approach but they tend to get worse. Some cases can be treated with the removal of the scab and the application of Vetericyn 2-3 times a day until healed, but most cannot.
or
2) Remove the scab and underlying infected tissue as detailed below.
BUMBLEFOOT SURGERY
Ideally, a chicken with bumblefoot will be treated by a poultry veterinarian. I do not have a poultry vet locally and the following procedures are the ones I use on my chickens’ bumblefoot infections. As unpleasant as the procedure is for me, I am always mindful that if I do not treat them, they will suffer. When the alternatives to not treating the bird are pain, death from the infection or euthanasia, I opt for treating my birds myself.
The procedure is not complicated or technically challenging, but it can be time consuming and emotionally taxing to perform this graphic procedure on one’s pet. It generally takes about an hour to complete and while it can be done by one person, two makes it much easier. I find that performing this procedure is best done at the kitchen sink where adequate lighting, counter space and a water source are available.
PAIN
There is no question that this procedure is painful. My chickens appear to tolerate this procedure well, however, chickens do not react to or express pain in ways we are accustomed to expect: crying, wincing, cringing, whimpering, etc. While the bird remains stoic throughout the procedure, the calm demeanor is thought to have evolved as a defense mechanism for self-preservation in the wild so as not to attract attention from predators. The bumblefoot removal procedure is indeed painful for chickens, however, local anesthetics should only be administered by a veterinarian. (veterinarians can perform a nerve block with .5 to 1.0 ml 2% lidocaine/2% injectable) My dog’s vet prescribed meloxicam, brand name Metacam® for me to keep on-hand for pain relief, which is safe for use in chickens. (The dosage is .5mg/kg After weighing the bird, this calculator calculates the amount for the chicken’s weight.) I give my chickens a dose thirty minutes prior to the procedure.
I always keep a basic first-aid kit handy and stocked with: Vetericyn VF, Betadine, triple antibiotic ointment, vitamins & electrolytes, sterile scalpels, non-stick gauze pads, Vetrap, tweezers, disposable gloves, Epsom salt, chlorhexadine 2% solution and scissors.
PREPARATION & EQUIPMENT
The supplies and equipment used include: several large towels, gloves, Vetrap, scalpel or biopsy punch, paper towels, chlorhexadine 2% solution spray, Vetericyn spray or triple antibiotic ointment & non-stick gauze. All of the supplies are available online at the affiliate links provided and many are commonly found in drugstores or supermarkets.
Infection control is of the utmost importance at every stage of this procedure. The sink is sanitized with a chlorhexadine 2% solution spray or bleach and water solution and sterile instruments are used. Gloves are worn to protect the bird and the operator as staph infections can be contracted by humans.The following is my YouTube video of bumblefoot surgery from start to finish.
SOAK
The affected foot is soaked in warm water and Epsom salt or warm water and Betadine and scrubbed for a general cleaning and to soften up the foot tissue. Chlorhexadine 2% solution spray is then applied to kill bacteria remaining on the surface of the foot. Very mild cases of bumblefoot may then be treated by excising the scab with a scalpel, applying chlorhexadine or Vetericyn to the abscess, covering with non-stick gauze and wrapping the foot with Vetrap. Vetericyn is re-applied two to three times a day and covered until healed. Not all cases of bumblefoot respond to this superficial treatment, however. Stubborn or more advanced abscesses are surgically removed. In some instances, antibiotics (such as Tylan 50 or oxytetracycline 200 mg intramuscular injections ) may be necessary, however none of my bumblefoot cases have required antibiotics in order to heal.
WRAP
When surgical removal is necessary, after the foot is cleaned the bird is wrapped very loosely in a towel, covering its head and eyes, ensuring ample breathing room. This keeps the bird immobilized and calm. It is laid on the work surface, on its back with the affected foot facing towards the operator. It helps to have assistant holding the chicken in place gently and securely. Talking to the chicken throughout the procedure can be reassuring to both the bird and the operator. Vetericyn VF is again applied to the foot. Some oozing blood is expected, but not ghastly amounts. Dabbing the blood with paper towels helps create a clearer view of the work area.
The object is to locate the heart of the abscess or dead tissue, which is commonly referred to as the “kernel,” core” or “plug.” The plug consists of dehydrated pus that has solidified- it often looks like a waxy, dried kernel of corn. Healthy tissue inside the foot is soft, pliable and pink. A solid kernel is not always present, in which case, the infection appears as stringy, slippery bits of thread-like, whitish/yellowish tissue.
Using a scalpel or biopsy punch, the foot pad is cut into around the circumference of the scab, straight down into the foot. A biopsy punch acts like an apple corer, removing the abscess. (I’m not a fan of the biopsy punch method.) If using a scalpel, the task is a bit more tedious as live tissue is teased away from the abscess little by little. The scab itself is often attached to the abscess and can help lift the core out of the foot with the aid of a dry paper towel.
BREATHE
Most of us are not accustomed to this type of invasive procedure and it can be taxing mentally and emotionally. Remembering to breathe throughout the procedure can help. We often find it necessary to sit down and regroup for a few minutes before returning to the job. Talking to the bird can be reassuring.
When a kernel is located and removed, the foot is again soaked in a sanitized sink or clean bowl containing chlorhexadine or Betadine water. The foot pad is gently squeeze and massaged to loosen any dead tissue remaining. The foot is dried, chlorhexadine or Vetericyn is again applied to the area, the chicken is re-wrapped in the towel and the removal procedure continues. It often takes quite a while of digging, squeezing and soaking, alternately, to remove the all of the affected tissue.
The following pictures show the removal a large kernel from an advanced infection.
FINISHING UP & BANDAGING
In cases where there is no central core or kernel, deciding when to end the procedure can be challenging. The stringy bits of tissue are extremely difficult to remove and it rarely seems as if it has all been removed. When it is determined that most of the tissue that can be removed has been removed, the foot is then prepared for bandaging.
Chlorhexadine spray is used to sanitize the area one last time, then a triple antibiotic ointment is liberally applied to the open wound a 2” x 2” square of non-stick gauze is placed over the wound. The four corners of the gauze are folded in towards the center of the square, creating a smaller square, which creates a little bit of pressure to the area to stem any residual bleeding or oozing and keeps the antibiotic ointment in place.
The gauze is kept in place with Vetrap, which is a self-adhesive bandaging material that is lightweight, flexible and requires no tape to stay securely in place. It is not sticky or gluey and it stays secure even under normal scratching and roosting activities. It is important not to pull the Vetrap too tightly as it can cut off circulation to the foot. One, six inch strip of Vetrap cut lengthwise into three or four smaller pieces is usually sufficient. The first strip of Vetrap is held in one hand, starting at the top of the foot and with the other hand, pulled over the gauze, then around and between the toes. The weaving is repeated with the remaining two strips, ending the wrap around the “ankle” by an inch or so.
OBSERVATION & FOLLOW-UP
The Vetrap remains in place for 24-48 hours after which it is removed to assess the wound.
If the gauze has stuck to the wound at all, soaking in warm water loosens it.
After the Vetwrap was removed, the gauze showed a little oozing, which is to be expected. The Vetwrap does a great job of keeping the area clean and dry. Stella has been in the coop with the rest of the flock since the surgery. Since the gauze was a little stuck to the wound area, (we had run out of non-stick gauze. oops) we soaked it in Epsom salt water before attempting to remove it.
This is exactly how the wound should look three days after the procedure. A new, healthy scab is forming, some of which came off with the removal of the gauze, but it looks healthy. We re-bandaged as described above.
The examination is intended to identify any redness, swelling, foul odor, red streaks up the foot and leg or excessive oozing that may indicate a secondary infection that would require treatment antibiotics.
If the foot appears to be healing well, the same wound care and bandaging procedure described above is repeated. The bandage remains on the foot for a week to ten days, changing it approximately 48 hours. A new and improved scab will form; it will not be black as the original scab may have been.
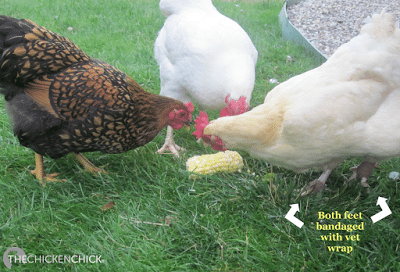
While injured chickens are ordinarily separated from the flock for their own protection from other flock members, it is not necessary when using Vetrap as the bandage stays securely in place and the wound cannot be accessed by curious birds.
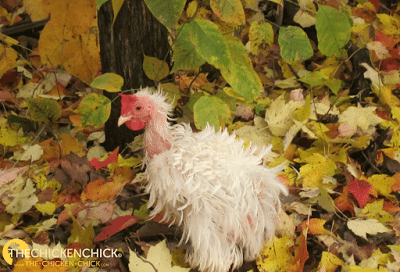
This is Phoebe five weeks after her bumblefoot surgery, happily digging in the woods. Back to business as usual and molting hideously.Four days post-op and Stella is out-and-about with the rest of the flock, getting her scratch on!
This post and my YouTube videos were featured at Backyard Poultry’s Healthy Chickens Bulletin on 12/5/12.


Wonderful tutorial on bumble foot
Thank you for the tutorial