


Wasted chicken feed drives me nuts and I was determined to build a feeder that would put an end to chickens billing feed out onto the ground. After much research, contemplating dozens of designs and several iterations of my own, I am now happy with my PVC feeder. There are no longer piles of wasted grain on the floor, which makes me, my chickens and my feed budget happy. Mine cost approximately $12.00 to build and was finished in 20 minutes.
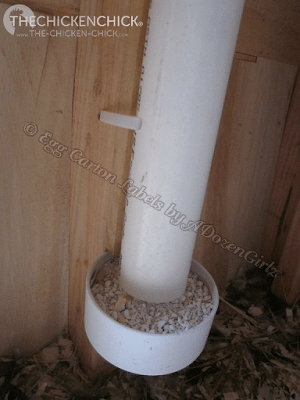
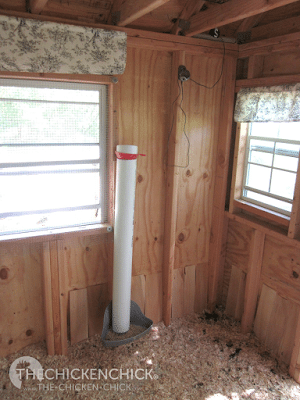 This is the finished feeder in my “Little Deuce Coop.”
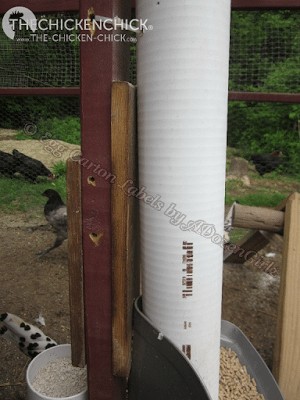
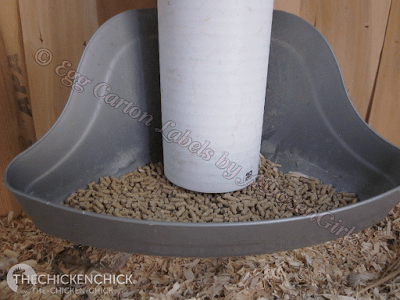
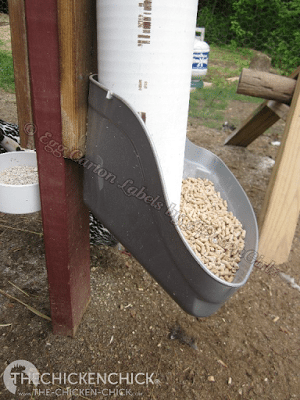 Side view of the feeder.
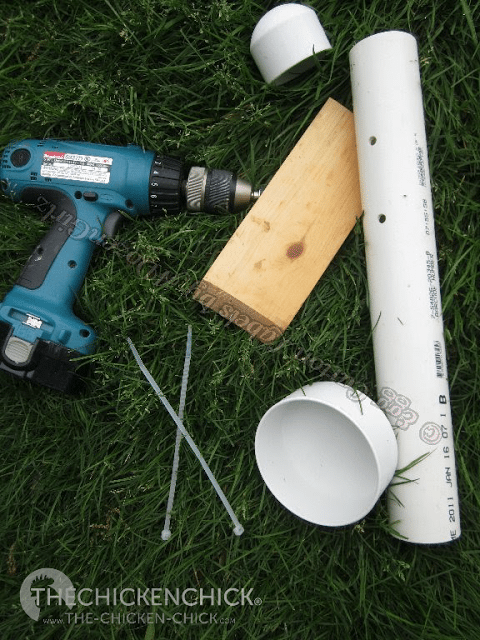
MATERIALS LIST:
A PVC pipe or irrigation tubing, cut to the length that will fit your chosen location. (I used a 4″ wide pipe for the feed and a smaller one for the oyster shell, various sizes will work)
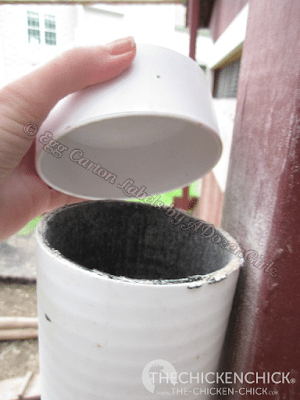
A PVC pipe cap for the top. (I used a 4″ cap, found in plumbing section of Home Depot)
A high corner litter pan
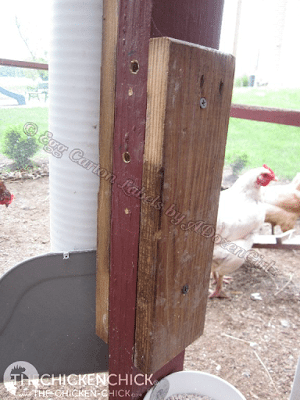
A piece of scrap wood
Extra long zip ties
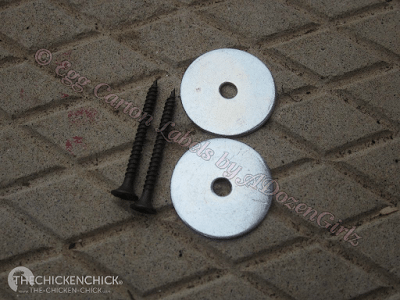
3 screws
3 washers
A drill
LET’S MAKE IT!
- Drill four holes in the pipe, two on each side where they will align with holes in stud. (see photo above)
- Drill two holes through the stud at measured increments that mirror the holes in the pipe. ( photo below)
- Mark where the “feed dish” will be mounted. The pipe should sit approximately 1/4″-1/2″ above the bottom of the feed dish. If the dish is too close to the bottom of the pipe, the feed will not flow out into the dish.

4. Secure the scrap piece of wood to the stud with screws and washers. (as shown below)

For an oyster shell or grit dispenser:
- Pre-drill one hole in a PVC pipe cap . Cap should be two inches wider than the pipe.
- Secure the pipe cap to the stud with a screw and washer.
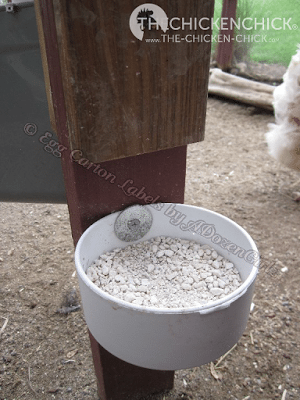
For a feed dispenser using a corner litter pan for feed:
- pre-drill two holes in the back of the litter pan where it will mount to the stud. Space them so that the washers align one above the other
- Secure the corner litter pan to the stud with screws and washers.
- Thread a zip tie through the two holes in the pipe and then the two holes in the stud and secure the zip tie to itself.
- Do the same for the second set of holes in the pipe and stud.
*NOTE: If installing feeder in the run, be sure to securely cover it at dusk to guard against rodents.
Click here for more tips on rodent control in and around the coop.**


Authorized online pharmacies, also offer the option to buy Viagra Generic online. At these providers, the prescription and the medication are ordered together. Doctors at our online pharmacy use a medical questionnaire to determine the appropriateness of the treatment and then issue a prescription. The sexual enhancement medication is mailed or can be picked up at a pharmacy near you.

Kathy Shea Mormino
Affectionately known internationally as The Chicken Chick®, Kathy Shea Mormino shares a fun-loving, informative style to raising backyard chickens. …Read on


shop my SPONSORS


Wasted chicken feed drives me nuts and I was determined to build a feeder that would put an end to chickens billing feed out onto the ground. After much research, contemplating dozens of designs and several iterations of my own, I am now happy with my PVC feeder. There are no longer piles of wasted grain on the floor, which makes me, my chickens and my feed budget happy. Mine cost approximately $12.00 to build and was finished in 20 minutes.
This is the finished feeder in my “Little Deuce Coop.”
Side view of the feeder.
MATERIALS LIST:
A PVC pipe or irrigation tubing, cut to the length that will fit your chosen location. (I used a 4″ wide pipe for the feed and a smaller one for the oyster shell, various sizes will work)
A PVC pipe cap for the top. (I used a 4″ cap, found in plumbing section of Home Depot)
A high corner litter pan
A piece of scrap wood
Extra long zip ties
3 screws
3 washers
A drill
LET’S MAKE IT!
- Drill four holes in the pipe, two on each side where they will align with holes in stud. (see photo above)
- Drill two holes through the stud at measured increments that mirror the holes in the pipe. ( photo below)
- Mark where the “feed dish” will be mounted. The pipe should sit approximately 1/4″-1/2″ above the bottom of the feed dish. If the dish is too close to the bottom of the pipe, the feed will not flow out into the dish.
4. Secure the scrap piece of wood to the stud with screws and washers. (as shown below)
For an oyster shell or grit dispenser:
- Pre-drill one hole in a PVC pipe cap . Cap should be two inches wider than the pipe.
- Secure the pipe cap to the stud with a screw and washer.
For a feed dispenser using a corner litter pan for feed:
- pre-drill two holes in the back of the litter pan where it will mount to the stud. Space them so that the washers align one above the other
- Secure the corner litter pan to the stud with screws and washers.
- Thread a zip tie through the two holes in the pipe and then the two holes in the stud and secure the zip tie to itself.
- Do the same for the second set of holes in the pipe and stud.
*NOTE: If installing feeder in the run, be sure to securely cover it at dusk to guard against rodents.
Click here for more tips on rodent control in and around the coop.**
Authorized online pharmacies, also offer the option to buy Viagra Generic online. At these providers, the prescription and the medication are ordered together. Doctors at our online pharmacy use a medical questionnaire to determine the appropriateness of the treatment and then issue a prescription. The sexual enhancement medication is mailed or can be picked up at a pharmacy near you.


Genius! I've been experimenting with different PVC feeder designs for my one little scissor-beaked hen that has to have a pretty wide open area to scoop food out of, but insists on kicking away as much of her food as possible in the process and no one wants it once on the ground… definitely giving this a shot tomorrow!
you could save a little $$ and use a shaped cut out plastic milk bottle for the feeder tray, no?
I tried the PVC pipe that is turned and has no success. This is so simple yet looks like it will work great! Thanks!!
This sounds great a friend of mine and I will be making a feeder for both our pens, thanks
there is a black rubber cap for a 4 inch PVC pipe. My son is a plumber and he suggested that. I got one and it works absolutely great